剛進公司就有91哥的訓練課程,剛好有機會接觸BDD的全貌流程,從完全不理解為何步驟如此頻繁透過工具簡化許多手動的操作的動作,進而提昇化工作效率的過程,以免日後忘了這個好用的東西,簡單作個分享囉~
一、外掛SpecFlow:
這是cucumber支援.net的擴充套件,真是佛心來的,可以從使用者的情境角度,直接相對應的產生測試案例,這比之前微軟推出的單元測試更直覺,還能重複使用情境案例

安裝Nuget 套件
- NUnit
- SpecFlow

新增Feature
的檔案後,要修改app.config 設定檔 --> 找到specFlow 的xml,修改如下所示
Feature.cs 預設以下的內文
|
<specFlow>
<unitTestProvider
name="MsTest"></unitTestProvider>
</specFlow> |
Feature.cs 預設以下的內文
Feature:
example
In
order to avoid silly mistakes (說明想做什麼)
As
a math idiot (角色)
I
want to be told the sum of two numbers (期望要驗證的事)
@mytag
(允許將情境做分類)
Scenario:
Add two numbers (情境說明要做什麼事)
Given
I
have entered 50 into the calculator (要加入的參教為
50
)
And
I
have entered 70 into the calculator (另外一個參教為
70
)
When
I
press add
(執行add事件)
Then
the
result should be 120 on the screen (期望結果傳回120)
|
根據說明,修改我們的Feature
檔如下
:
舉例:
如果客戶的資料檔中如果共計有五筆資料,輸入查詢區間為2014-07-03~
2014-07-07查詢結果為只有只有符合該區間的筆數共3筆,驗證其結果是否符合預期。
Scenario:
依據姓名、訂單日期起、訂單日期迄條件,查出顧客的訂單
(情境說明要做什麼事)
Given
查詢條件為
(要加入的參教為
資料表(CustomerId
| OrderDateStart | OrderDateEnd)
|
CustomerId |
OrderDateStart |
OrderDateEnd |
|
Joey |
2014-07-03 |
2014-07-07 |
And
預計Customers資料應有
(要加入的參教為
資料表(CustomerID
| CompanyName )
|
CustomerID |
CompanyName |
|
Joey |
SkillTree |
And
預計Orders資料應有
(要加入的參教為
資料表(CustomerID
| OrderDate | ShipCity )
|
CustomerID |
OrderDate |
ShipCity |
|
Joey |
2014-07-02 |
Taipei |
|
Joey |
2014-07-03 |
Taipei |
|
Joey |
2014-07-04 |
Changhua |
|
Joey |
2014-07-05 |
Changhua |
|
Joey |
2014-07-08 |
Changhua |
When
呼叫Query方法
(要執行
Query
的方法
)
Then
查詢結果應為
(預期傳回的結果
)
|
CustomerID |
OrderDate |
ShipCity |
|
Joey |
2014-07-03 |
Taipei |
|
Joey |
2014-07-04 |
Changhua |
|
Joey |
2014-07-05 |
Changhua | |
當我們的條件模擬狀況寫完了之後… 然到還要回到測試案例寫測試程式嗎? 當然不用啦~ 在Featur 的內文,按下【右鍵】產生Generate Stdep Definition 就產生對應的測試案例囉~ 先給個讚吧!

按下右鍵 go
to stdep Definition (到測試程式的函式名稱)
PS:測試內容當然要自已寫囉~~
所以以下示範如何寫測試程式
[Binding]
[Scope(Feature
= "OrderQuery")]
public
class
OrderQuerySteps
{
private
OrderService
target;
private
NorthwindEntitiesInTest
dbContext;
//在所有測試案例起動之前,執行此區塊,目的用來先清掉之前的遺留假資料
[BeforeScenario]
public
void
BeforeScenario()
{
this.target
= new
OrderService();
//為了直接測試資料庫的真實行為
呼叫entity
實體資料庫
using
(dbContext = new
NorthwindEntitiesInTest())
{
dbContext.Database.ExecuteSqlCommand("Delete
[Orders] Where CustomerID IN ('Joey','JoeyTest')");
dbContext.Database.ExecuteSqlCommand("Delete
[Customers] Where CustomerID IN('Joey','JoeyTest')");
}
}
//在所有測試案例起動之後,執行此區塊,目的用來先清掉之前的遺留假資料
[AfterScenario]
public
void
AfterScenario()
{
using
(dbContext = new
NorthwindEntitiesInTest())
{
dbContext.Database.ExecuteSqlCommand("Delete
[Orders] Where CustomerID IN ('Joey','JoeyTest')");
dbContext.Database.ExecuteSqlCommand("Delete
[Customers] Where CustomerID IN('Joey','JoeyTest')");
}
}
[Given(@"查詢條件為")]
public
void
Given查詢條件為(Table
table)
{
//傳入的table
型態,直接轉換成物件
var
condition = table.CreateInstance<OrderQueryCondition>();
//將要將查詢條件暫存記憶體
ScenarioContext.Current.Set<OrderQueryCondition>(condition);
}
[Given(@"預計Customers資料應有")]
public
void
Given預計Customers資料應有(Table
table)
{
var
customers =
table.CreateSet<SpecFlowWithEf.Tests.ModelInTest.Customers>();
using
(dbContext = new
NorthwindEntitiesInTest())
{
foreach
(var
customer in
customers)
{
dbContext.Customers.Add(customer);
}
dbContext.SaveChanges();
//要將客戶的假資料存到實體資料庫中
}
}
[Given(@"預計Orders資料應有")]
public
void
Given預計Orders資料應有(Table
table)
{
var
orders =
table.CreateSet<SpecFlowWithEf.Tests.ModelInTest.Orders>();
using
(dbContext = new
NorthwindEntitiesInTest())
{
foreach
(var
order in
orders)
{
dbContext.Orders.Add(order);
}
dbContext.SaveChanges();
//要將訂單的假資料存到實體資料庫中
}
}
[When(@"呼叫Query方法")]
public
void
When呼叫Query方法()
{
//取得查詢條件的資料
var
condition = ScenarioContext.Current.Get<OrderQueryCondition>();
//service回傳的,不一定需要是
dbContext
中
EF
產生的
model
型別
IEnumerable<MyOrder>
actual = this.target.Query(condition);
//將回傳的結果儲存
ScenarioContext.Current.Set<IEnumerable<MyOrder>>(actual);
}
[Then(@"查詢結果應為")]
public
void
Then查詢結果應為(Table
table)
{
//將預期的結果儲存
var
actual = ScenarioContext.Current.Get<IEnumerable<MyOrder>>();
//比較結果
table.CompareToSet<MyOrder>(actual);
}
} |
PS:[BeforeScenario]
和
[AfterScenario]
是自已加上的區塊,跑所以測試案例之前
或 之後都執行的區塊,如果不需要用到,也就不用特別加了。
以上截取91的上課程式範例
四、用工具產生文件
如果寫完所有的測試案例之後,主管要求寫文件,這也令工程師頭痛的吧~
所以也有人佛心的寫的套件,自動產生線上文件喔,前提是要有Feature檔和自動產生的測試程式,才能自動產生文件喔…
讓我們再來看看神奇的魔術吧~
下戴工具包
或者
nuget pickles
nuget
picklesui 圖形化的線上文件產生器

feature
Directory : 選擇Feature
檔的資料夾
output
Directory : 選擇 匯出文件的目錄
project
name : 專案名稱
project
version : 版次
產生的OrderQuery的需求案例
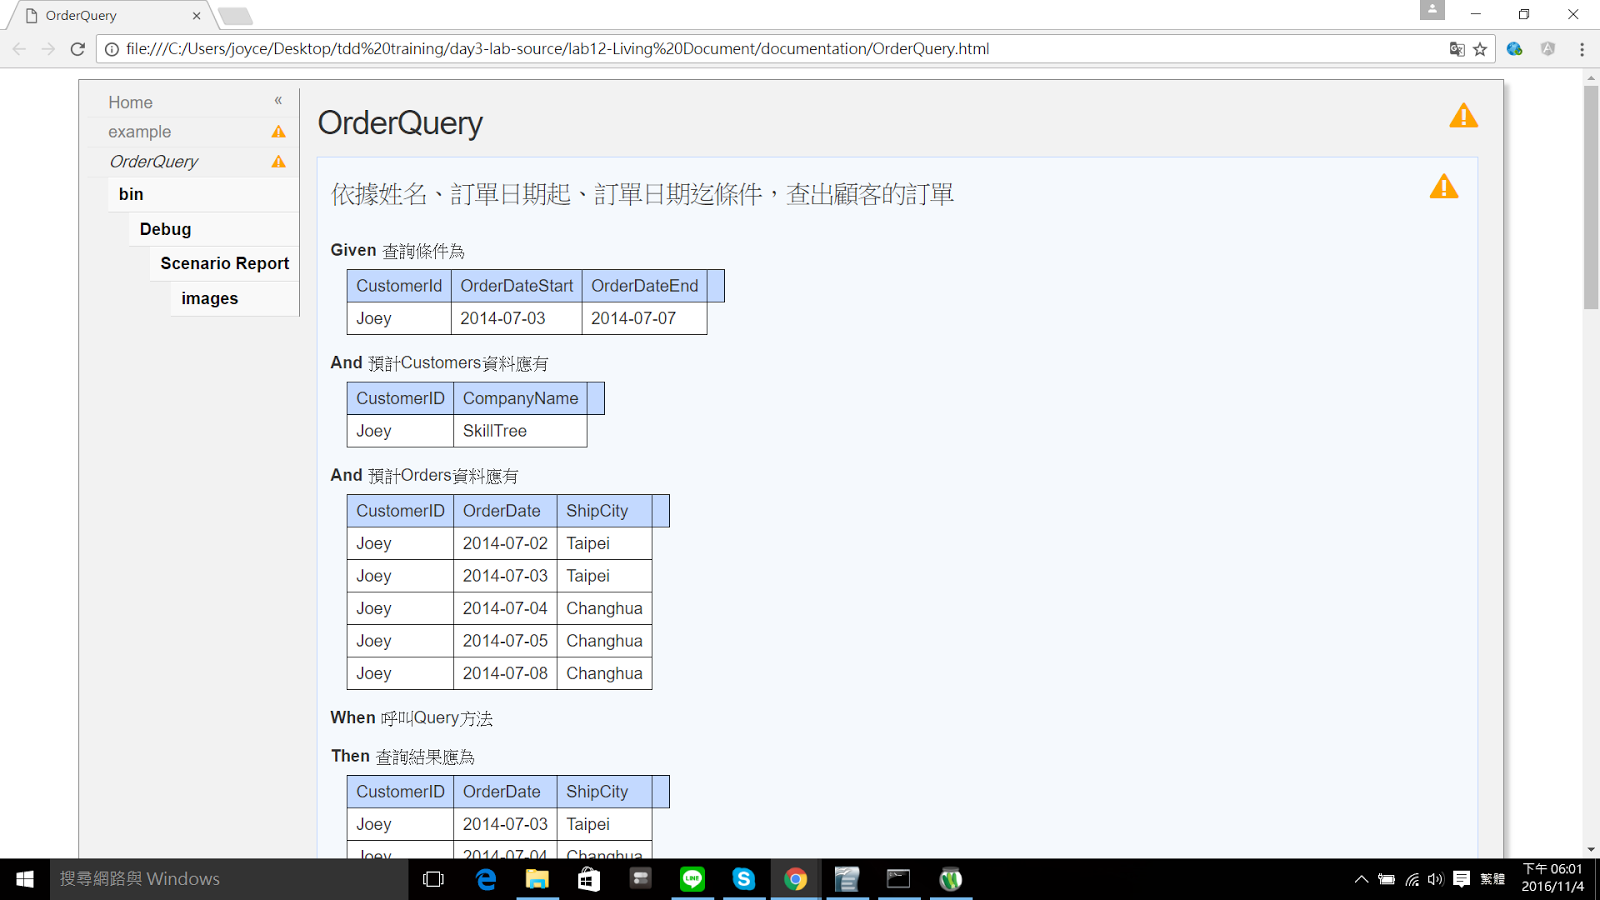
結論:
各位看倌~
你不用寫任何一行文件需求,自動生成的文件,隨著案例不同,文件也隨之自動產生,不需要SA
或 工程師辛苦的修改文件了…
多麼神奇啊,每一次的修改程式都有不如預期的地方,也許是邏輯不夠完善,透過每次的演化BDD的情境模擬,來讓程式更加完善,需求異動頻繁更需要測試,透過VS擴充工具讓原本無法預期的程式變得更可預測,縮短BUG的週期…
如果有不完善的地方,還期望各位多多的補充喔…


