顯示具有 asp.net mvc 標籤的文章。 顯示所有文章

2016年2月3日 星期三

Cordova推播 parII-c#如何推播IOS裝置

一、下戴IOS的憑證
憑證輔助程式à 為憑證授權要求憑證à儲存至桌面
 

選擇App IDs


登入App IDS,勾選Push Notifications


將私鑰匯出後,上傳到Push Notifications,並下戴相關憑證


開啟keyChainè 鑰匙圈點選【登入】, 類別點選【憑證】


在IOS Push Services 的專用密鑰-->按下右鍵匯出匯出成.p12
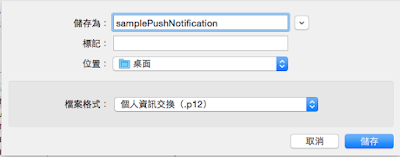

切記:要有兩份p.12  因為一份是開發人員,另一份是正式環境下使用憑證


二、部署到客戶的端的APP程式

引用相關的函式庫
<script type="text/javascript" src="//cdn.pubnub.com/pubnub-3.7.4.min.js"></script>
<script src="cordova.js"></script>
<script src="scripts/platformOverrides.js"></script>    

config.xml 加入推播的外掛程式
https://github.com/phonegap-build/PushPlugin.git

目前測試最新版的2.5.0 會出現問題,但安裝2.4.0卻很正常,原因不明,請各位自行測試

如果在mac環境下建立的cordova 需要下指令外掛
cordova plugin add https://github.com/phonegap-build/PushPlugin.git


接收推播訊息和手機裝置碼
var pushNotification;
(function () {
    "use strict";
    document.addEventListener('deviceready', onDeviceReady.bind(this), false);
   function onDeviceReady() {      
        pushNotification = window.plugins.pushNotification;    
        //IOS裝置 :註冊ID
        pushNotification.register(tokenHandler, errorHandler, { "badge": "true", "sound": "true", "alert": "true", "ecb": "onNotificationAPN" });
        document.addEventListener('pause', onPause.bind(this), false);
        document.addEventListener('resume', onResume.bind(this), false);      
    };  
    function successHandler(result) {
        alert("success OK");
    }
    function errorHandler(error) {
        alert('失敗');
    }
    function tokenHandler(result) {
        var xmlhttp = new XMLHttpRequest();
        xmlhttp.open("GET", "http://192.168.1.63/codovaWebAPI/api/apiPatient/registID/" + result + "/platform/IOS", true); // 儲存手機的註冊ID,這要自己寫  WEB API
        xmlhttp.send();
        navigator.notification.alert(result, null, 'Alert', 'OK');
        sessionStorage.setItem("deviceId", result);
        sessionStorage.setItem("notificationServer", "APNS");
    }
    function onNotificationAPN(e) {
        if (e.alert) {
            navigator.notification.alert(e.alert);
        }
        if (e.sound) {
            var snd = new Media(e.sound);
            snd.play();
        }
// 它可以在ICON圖示上面顯示號碼喔
        if (e.badge) {
            pushNotification.setApplicationIconBadgeNumber(successHandler, e.badge);
        }
    }


三、asp.net MVC建立推播的網頁

view 的樣版
<div>
    <form method="post">
       <label>請輸入推播的裝置ID</label>
       <input type="text" name="deviceID" />
       <label>請輸入推播內容</label>               
       <input type="text" name="pushMessage" />
      <input type="submit" />
    </form>
</div>

Controler
  [HttpPost]
        public ActionResult Index(string deviceID, string pushMessage)
        {
//有多種裝置平台 (所以作者將其包裝物件,到時就取用哪種裝置的推播方式)
              Notification.pushMessage pushMessageObj = new Notification.pushMessage();
              pushMessageObj.SendIPhoneNotification(deviceID, pushMessage); //呼叫Ipone的推播模式
              return View();
        }

PushMessage.cs


ios特有的傳輸格式,要符合以下格式


   public bool SendIPhoneNotification(string deviceID, string message)
        {
            int port = 2195;  
            String hostname = "gateway.sandbox.push.apple.com"
//記得mac匯出推播的私有憑證 .p12 要放在專案中才可以推 播成功,因為要需要APN驗證
            String certificatePath = HttpContext.Current.Server.MapPath("~/Certificate/ckDeveloper.p12"); //上式上線部署app後,要改為正式版
            X509Certificate2 clientCertificate = new X509Certificate2(System.IO.File.ReadAllBytes(certificatePath), "16145679");//匯出憑證使用的密碼
            X509Certificate2Collection certificatesCollection = new X509Certificate2Collection(clientCertificate);
            TcpClient client = new TcpClient(hostname, port);
            SslStream sslStream = new SslStream(client.GetStream(), false, new RemoteCertificateValidationCallback(ValidateServerCertificate), null);
            try
            {
                sslStream.AuthenticateAsClient(hostname, certificatesCollection, System.Security.Authentication.SslProtocols.Tls, true);
                MemoryStream memoryStream = new MemoryStream();
                BinaryWriter writer = new BinaryWriter(memoryStream);
                writer.Write((byte)0);
                writer.Write((byte)0);
                writer.Write((byte)32);
                writer.Write(HexStringToByteArray(deviceID.ToUpper()));
//設定推播的訊息,badge: icon 上顯示通知數
                String payload = "{\"aps\":{\"alert\":\"" + message + "\",\"badge\":1,\"sound\":\"default\"}}";
                writer.Write((byte)0);
                writer.Write((byte)payload.Length);
                byte[] b1 = System.Text.Encoding.UTF8.GetBytes(payload);
                writer.Write(b1);
                writer.Flush();
                byte[] array = memoryStream.ToArray();
                sslStream.Write(array);
                sslStream.Flush();
                client.Close();
                return true;
            }
            catch (System.Security.Authentication.AuthenticationException ex)
            {
                client.Close();
                return false;
            }
            catch (Exception e)
            {
                client.Close();
                return false;
            }
        }
        private static byte[] HexStringToByteArray(String DeviceID)
        {
            byte[] deviceToken = new byte[DeviceID.Length / 2];
            for (int i = 0; i < deviceToken.Length; i++)
                deviceToken[i] = byte.Parse(DeviceID.Substring(i * 2, 2), System.Globalization.NumberStyles.HexNumber);
            return deviceToken;
        }

        public static bool ValidateServerCertificate(object sender, X509Certificate certificate, X509Chain chain, SslPolicyErrors sslPolicyErrors)
        {
            if (sslPolicyErrors == SslPolicyErrors.None)
                return true;
            else // Do not allow this client to communicate with unauthenticated servers.
                return false;
        }

四、部署APP

開啟 \platform\ios\filename.xcodeproj,點選【capabilities】開啟Push Notifications 


五、結論

因為模擬器上無法顯示推播所以沒辦法展示推播成功的圖片,但部署在Iphone手機上確實收到推播訊息,希望這篇文章有幫助到各位喔~


參考資料:

2015年9月2日 星期三

Angular + Asp.net MVC 多檔上傳

自從Html5 增加file的功能後,檔案上傳的功能簡化不少,剛好有案子正好需要上傳圖片,所以可以示範如何在Angular 上傳檔案後,再經由MVC後端接收圖片的教學,最後又透過Angular的特殊功能,把多張圖片展示在列表上。

一、HTML5 的語法
瀏覽器已經將上傳檔案的功能內建化,所以讓後端處理細節簡化不少,
加上multiple 允許多個檔案上傳,預設只能單檔上傳,所以multiple 屬性要加上

<input type="file" name="multipleFiles" multiple />

二、Angular的語法

傳統的網頁是經由post把網頁內的form 資訊往server後端傳遞,但是
Ajax已經是網頁必備的功能,只將部份訊息往後端傳遞,所以angular中宣告formData變數就是要把前端的訊息集中起來,再呼叫$http.postformData 送給asp.net MVC controller

Angular 有很多參數和函數,作者沒有深入研究,因為$http.post是非常方便的工具,$http Angular和遠端http Server 溝通的核心

var formData = new FormData();//傳送到後端的資訊
      //上傳多張圖片
                $.each($("input[name='multipleFiles']"), function (i, obj) {
                    $.each(obj.files, function (j, file) {                       
                        formData.append('photo[' + j + ']', file);  //以陣列方式傳遞多檔圖片或檔案
                    })
                });        
$http.post(‘../Test/AddReleaseBug’, formData, {
   headers: { 'Content-Type': undefined }
 }).then(function (res) {
 alert("儲存成功");
}));

  
三、Asp.net MVC

Asp.net MVC為了要接收來自前端的上傳的圖片,所以宣告
HttpPostedFileBase陣列的型態去接收檔案,就可以接收多個檔案,為了隔離網頁的呈現層(asp.net mvc)和企業邏輯,所以增加實體層entityTest 負責資料DB的取得,如果網頁架構較大時,可以增加控制層,負責更細節的邏輯控制,再由控制層再呼叫實體層,這就是早期的三層式架構(MVC)模式。

Asp.net Controller
      [HttpPost]
        public async Task<bool> AddReleaseBug( IEnumerable<HttpPostedFileBase>[] photo)
        {         
            string path = "bugFile";
            string strMultiFiles = "";         
           if (photo != null)
                {
                    foreach (IEnumerable<HttpPostedFileBase> uploadImage in photo)
                    {
                        strMultiFiles += await entityTestObj.fileUpload(uploadImage, path) + ",";
                    }
                    strMultiFiles = strMultiFiles.Substring(0, strMultiFiles.Length - 1);
                }
        }

實體層:
FileUpload 負責把檔案儲存到指定的路徑中,並把檔名回傳
  public async Task<string> fileUpload(IEnumerable<HttpPostedFileBase> addDownloadFile, string path)
        {
            try
            {
                var fileName = "";
                var httpPath = HttpContext.Current.Server.MapPath("~/" + path);
                Directory.CreateDirectory(httpPath); //路徑不存在自已建立
                if (addDownloadFile.Count() > 0)
                {
                    foreach (HttpPostedFileBase file in addDownloadFile)
                    {
                        fileName += Path.GetFileName(file.FileName) + ",";
                        var pathFileName = Path.Combine(httpPath, file.FileName);
                        file.SaveAs(pathFileName);
                    }
                    fileName = fileName.Substring(0, fileName.Length - 1);                  
                }
                return fileName;
            }
            catch (Exception ex)
            {
                writeObj.writeToFile("ManageFileVersion_" + DateTime.Now.ToString("yyyyMMdd"), HttpContext.Current.Server.MapPath("~"), "fileUpload error: " + ex.Message);
                throw new Exception(ex.Message);
            }
}

示範: photo陣列集中共有3個檔案上傳

四、Angular如何split(“,”)

有點偏離主題,因為延續多檔上傳的功能,我將多檔案名稱儲存在同一欄位
中,並以『,』隔離,所以如果要在前端呈現多個圖片時,要以逗號隔離,但是Angular 有支援split的功能,所以這是一個好用的工具喔。

<font color="blue">圖片</font>:<br />
<a href="~/bugFile/{{::bug.bugDocumentFile.split(',')[0] }}" arget="_blank">{{::bug.bugDocumentFile.split(',')[0] }}</a>
<a href="~/bugFile/{{::bug.bugDocumentFile.split(',')[1] }}" arget="_blank">{{::bug.bugDocumentFile.split(',')[1] }}</a>
<a href="~/bugFile/{{::bug.bugDocumentFile.split(',')[2] }}" arget="_blank">{{::bug.bugDocumentFile.split(',')[2] }}</a>
<a href="~/bugFile/{{::bug.bugDocumentFile.split(',')[3] }}" arget="_blank">{{::bug.bugDocumentFile.split(',')[3] }}</a>
<a href="~/bugFile/{{::bug.bugDocumentFile.split(',')[4] }}" arget="_blank">{{::bug.bugDocumentFile.split(',')[4] }}</a>     

如果以上有更好的建議的話,歡迎多多留言,希望在這共同的平台上面,大
家可以共同教學相長。

五、文獻參考
1.    https://docs.angularjs.org/api/ng/service/$http