一、下戴IOS的憑證
憑證輔助程式à 為憑證授權要求憑證à儲存至桌面

選擇App IDs


登入App IDS,勾選Push
Notifications

將私鑰匯出後,上傳到Push Notifications,並下戴相關憑證

開啟keyChainè 鑰匙圈點選【登入】, 類別點選【憑證】

在IOS Push Services 的專用密鑰-->按下右鍵匯出匯出成.p12
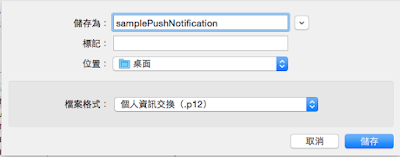
切記:要有兩份p.12 因為一份是開發人員,另一份是正式環境下使用憑證


切記:要有兩份p.12 因為一份是開發人員,另一份是正式環境下使用憑證
二、部署到客戶的端的APP程式
引用相關的函式庫
<script type="text/javascript" src="//cdn.pubnub.com/pubnub-3.7.4.min.js"></script>
<script src="cordova.js"></script>
<script src="scripts/platformOverrides.js"></script>
|
在config.xml 加入推播的外掛程式
https://github.com/phonegap-build/PushPlugin.git

目前測試最新版的2.5.0 會出現問題,但安裝2.4.0卻很正常,原因不明,請各位自行測試
如果在mac環境下建立的cordova 需要下指令外掛
cordova plugin add https://github.com/phonegap-build/PushPlugin.git |
接收推播訊息和手機裝置碼
var pushNotification;
(function () {
"use
strict";
document.addEventListener('deviceready', onDeviceReady.bind(this), false);
function onDeviceReady() {
pushNotification =
window.plugins.pushNotification;
//IOS裝置 :註冊ID
pushNotification.register(tokenHandler, errorHandler, { "badge": "true", "sound": "true", "alert": "true", "ecb": "onNotificationAPN" });
document.addEventListener('pause', onPause.bind(this), false);
document.addEventListener('resume', onResume.bind(this), false);
};
function successHandler(result) {
alert("success OK");
}
function errorHandler(error) {
alert('失敗');
}
function tokenHandler(result) {
var xmlhttp = new XMLHttpRequest();
xmlhttp.open("GET", "http://192.168.1.63/codovaWebAPI/api/apiPatient/registID/" + result + "/platform/IOS", true); // 儲存手機的註冊ID,這要自己寫 WEB API喔
xmlhttp.send();
navigator.notification.alert(result, null, 'Alert', 'OK');
sessionStorage.setItem("deviceId", result);
sessionStorage.setItem("notificationServer", "APNS");
}
function onNotificationAPN(e) {
if (e.alert) {
navigator.notification.alert(e.alert);
}
if (e.sound) {
var snd = new
Media(e.sound);
snd.play();
}
// 它可以在ICON圖示上面顯示號碼喔
if (e.badge) {
pushNotification.setApplicationIconBadgeNumber(successHandler,
e.badge);
}
}
|
三、用asp.net MVC建立推播的網頁
view 的樣版
<div>
<form method="post">
<label>請輸入推播的裝置ID</label>
<input type="text" name="deviceID" />
<label>請輸入推播內容</label>
<input type="text" name="pushMessage" />
<input type="submit" />
</form>
</div>
|
Controler
[HttpPost]
public ActionResult
Index(string deviceID, string pushMessage)
{
//有多種裝置平台 (所以作者將其包裝物件,到時就取用哪種裝置的推播方式)
Notification.pushMessage pushMessageObj = new
Notification.pushMessage();
pushMessageObj.SendIPhoneNotification(deviceID, pushMessage); //呼叫Ipone的推播模式
return View();
}
|
PushMessage.cs

ios特有的傳輸格式,要符合以下格式

public bool SendIPhoneNotification(string deviceID, string message)
{
int port = 2195;
String hostname = "gateway.sandbox.push.apple.com";
//記得mac匯出推播的私有憑證 .p12 要放在專案中才可以推 播成功,因為要需要APN驗證
String certificatePath = HttpContext.Current.Server.MapPath("~/Certificate/ckDeveloper.p12"); //上式上線部署app後,要改為正式版
X509Certificate2 clientCertificate = new X509Certificate2(System.IO.File.ReadAllBytes(certificatePath),
"16145679");//匯出憑證使用的密碼
X509Certificate2Collection certificatesCollection = new X509Certificate2Collection(clientCertificate);
TcpClient client = new TcpClient(hostname,
port);
SslStream sslStream = new SslStream(client.GetStream(),
false, new RemoteCertificateValidationCallback(ValidateServerCertificate), null);
try
{
sslStream.AuthenticateAsClient(hostname, certificatesCollection,
System.Security.Authentication.SslProtocols.Tls, true);
MemoryStream memoryStream = new MemoryStream();
BinaryWriter writer = new BinaryWriter(memoryStream);
writer.Write((byte)0);
writer.Write((byte)0);
writer.Write((byte)32);
writer.Write(HexStringToByteArray(deviceID.ToUpper()));
//設定推播的訊息,badge: 在icon 上顯示通知數
String payload = "{\"aps\":{\"alert\":\""
+ message +
"\",\"badge\":1,\"sound\":\"default\"}}";
writer.Write((byte)0);
writer.Write((byte)payload.Length);
byte[] b1 = System.Text.Encoding.UTF8.GetBytes(payload);
writer.Write(b1);
writer.Flush();
byte[] array = memoryStream.ToArray();
sslStream.Write(array);
sslStream.Flush();
client.Close();
return true;
}
catch (System.Security.Authentication.AuthenticationException ex)
{
client.Close();
return false;
}
catch (Exception e)
{
client.Close();
return false;
}
}
private static byte[] HexStringToByteArray(String DeviceID)
{
byte[] deviceToken = new byte[DeviceID.Length / 2];
for (int i =
0; i < deviceToken.Length; i++)
deviceToken[i] = byte.Parse(DeviceID.Substring(i * 2, 2),
System.Globalization.NumberStyles.HexNumber);
return deviceToken;
}
public static bool ValidateServerCertificate(object sender, X509Certificate certificate, X509Chain
chain, SslPolicyErrors
sslPolicyErrors)
{
if (sslPolicyErrors == SslPolicyErrors.None)
return true;
else // Do not allow this client to
communicate with unauthenticated servers.
return false;
}
|
四、部署APP
開啟
\platform\ios\filename.xcodeproj,點選【capabilities】開啟Push Notifications

五、結論

因為模擬器上無法顯示推播所以沒辦法展示推播成功的圖片,但部署在Iphone手機上確實收到推播訊息,希望這篇文章有幫助到各位喔~
參考資料:


